


 Southern New England Jewish Ledger
By Naomi Ross
Folding chairs lined the hallway wall like dutiful soldiers in expectation of arriving guests. Unfamiliar, dusty boxes of pots and china were stacked high, their contents waiting to make their annual appearance on the dining room table. As a child, the anticipation during those momentous days leading up to Passover was palpable. I couldn’t help but sense the urgency – something big was imminent and I wanted to be a part of it. Fortunately for me, my mother was adept at putting me to work, getting me involved in the preparations, and effectively igniting a spark in her daughter to experience the excitement of the holiday. As a parent, I’ve realized the mitzvah (commandment) of educating your children about the story of the Exodus from Egypt begins earlier– not at the seder, but before, in the kitchen.
Children learn experientially (and so do adults!). They need to engage all of their senses to really internalize a concept or lesson. That’s why we hold up the shank bone, the matzah and the bitter herbs – our seders come complete with props and visual aids! How do we pass on our traditions and customs in a way that is meaningfully relevant to the next generation? It happens first by inviting them to take part in the preparations and cooking, fostering a feeling of being invested in the holiday experience. That is what makes Passover real for them. The door to meaningful conversations is opened there in the kitchen, while peeling apples or rolling matzah balls.
There are many jobs that are perfect for this purpose and are appropriate for a wide range of ages. Here are few suggestions:
- Making Charoset
As a child, I thought making Charoset was an all-day process. Peeling, coring and chopping the apples took forever. Chopping nuts in our little manual glass jar chopper was such hard work for a little one that by the time I finished, I felt as though I were enslaved in Egypt, too! Truth be told, it was the perfect job – it kept me busy for a long time and I felt very accomplished afterward. Come seder night, I was incredibly proud to pass around the charoset I made myself.
*Safety Tip: For younger children for whom sharp knives are inappropriate, an old-fashioned hand-held chopper and a large chopping bowl are the way to go.
- Peeling hard-boiled eggs – all kids think this is fun. I have no idea why, but they do…so teach them how and let them.
- Setting the table – There are many more things to prepare on the Seder table than for a regular meal: assembling Haggadahs, pillows for reclining, salt water, and preparing the Seder plate all take time. If your children are creative, they can create pretty folded napkins or handmade place cards. Both are fantastic craft projects for artistic kids.
- Cooking and Baking – for older kids who are able to follow a recipe (or interested in learning), this is a great opportunity to teach your kids basic lessons in cooking and baking. I still remember being called over to help taste and season a simmering dish; and it was in my mother’s Passover kitchen that I learned how to beat egg whites into “stiff peaks” for baking Passover sponge cakes.
No matter how you enlist your children, the real secret to getting them involved is by showing your own interest and excitement. When your kids see you enjoying yourself and getting into the spirit, then they will follow suit and reflect that joy into your home. Consider giving your holiday menu a refresh with some modernized twists on traditional recipes from The Giving Table!
Below are some of Naomi Ross’s favorite Passover recipes!
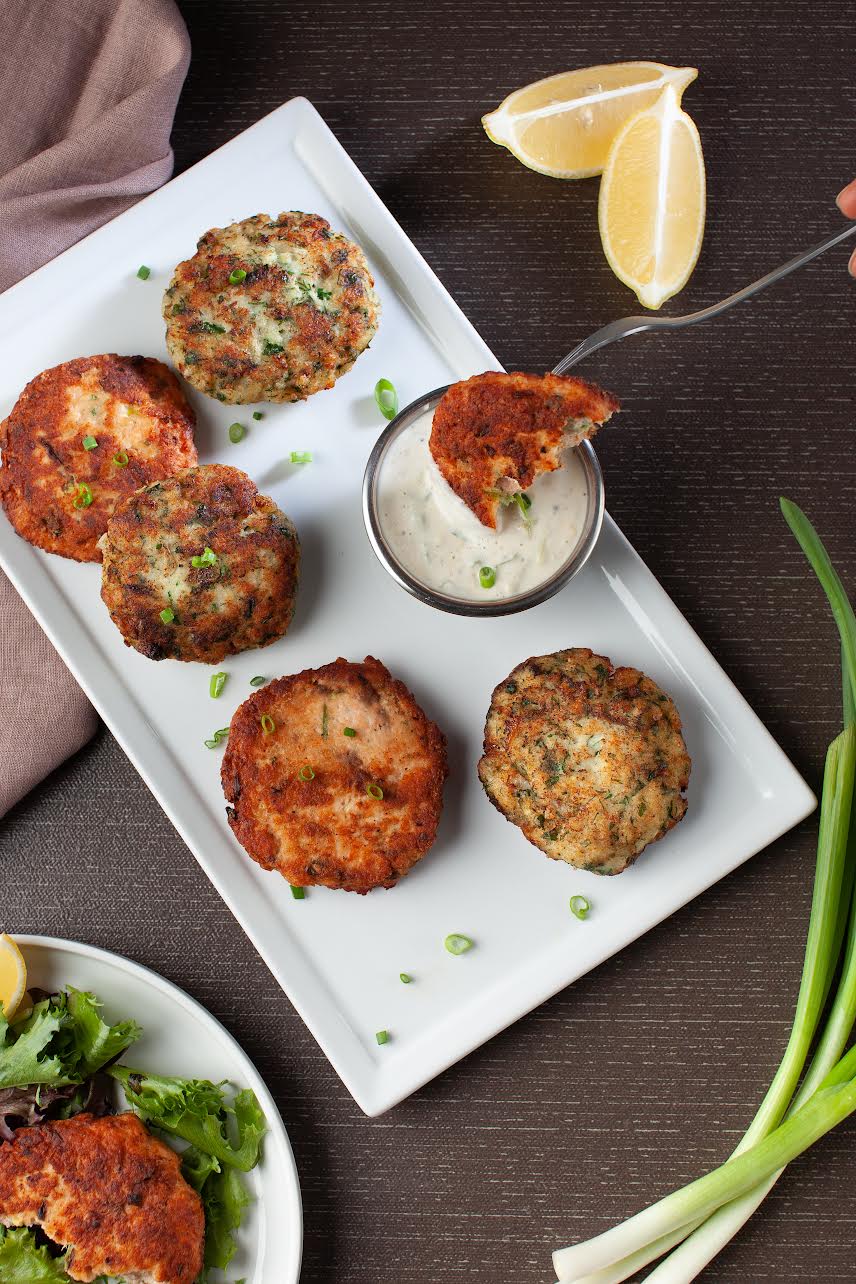
Herbed Fish Cakes with Lemon-Horseradish Sauce
A nice alternative to gefilte fish, these fish cakes are fresh and flavorful. The raw patties can be prepared a day ahead and refrigerated. To refresh and reheat cooked cakes, warm in a single layer on a baking sheet in 350°F oven until hot and re-crisped.
Yield: 10–12 fish cakes or about 20 mini fish cakes
Prep Time: 10–15 minutes
Cook Time: 18–20 minutes
Difficulty: Worth the wait
Freezer friendly
Cook’s Note: While I love the delicate flavor of white-fleshed fish cakes, this recipe will also work with salmon fillets (reduce the salt slightly).
Do Ahead: Patties can be formed a day ahead and refrigerated or frozen between sheets of parchment paper for up to two months. Lemon-Horseradish Sauce can be made up to three days ahead.
- 1½ pounds skinless cod or haddock fillets, chunked
- 1 shallot, peeled and quartered or 2 scallions (white and green parts)
- ⅓ cup packed fresh Italian parsley
- ⅓ cup packed fresh dill
- juice of ½ large lemon (about 1 Tablespoon)
- 1½ teaspoons sweet pickle relish
- 1¼ teaspoons coarse kosher salt
- ½ teaspoon coarsely ground black pepper
- 1 egg or 2 Tablespoons mayonnaise
- ⅓–½ cup matzah meal (or 1 cooked potato, riced)
- ¾ cup vegetable oil or more as needed, for frying
Lemon-Horseradish Sauce
- ½ cup mayonnaise
- 3 scallions, thinly sliced
- ½ teaspoon grated lemon peel (from ½ lemon)
- juice of 1 lemon (about 2 Tablespoons)
- 2–3 teaspoons prepared white horseradish
- ½ teaspoon kosher salt, or more to taste
- freshly ground black pepper, to taste
- Make fish mixture: Line a baking sheet with waxed paper or parchment; set aside. Place fish, shallot, herbs, lemon juice, relish, salt, pepper, and egg in a food processor fitted with an “S” blade. Pulse processor until finely chopped — do not puree to a paste; the mixture should be chunky and textured. (Do not overstuff food processor or it won’t process evenly — you may need to do this in batches depending on the size of your processor.)
- Form patties: Transfer mixture to a large mixing bowl. Add ⅓ cup bread crumbs, mixing until well blended. Add additional crumbs as needed for the mixture to hold together. Using moistened hands, form mixture into even rounds — about ⅓-inch-thick cakes. Arrange on prepared baking sheet. Refrigerate for 1 hour (or place in freezer for 15 minutes) to set. (This can be made one day ahead. Cover and chill.)
- Fry: Over medium heat, heat enough oil to cover the bottom of a large skillet. Working in batches, fry cakes until nicely browned on each side and opaque in center, about 3 minutes per side. Transfer to a paper-towel-lined plate to drain.
Sauce: In a small bowl, whisk together all Lemon-Horseradish Sauce ingredients until smooth. Season to taste with salt and pepper. Serve patties warm or at room temperature with sauce over a bed of mixed greens, or as burgers with buns, lettuce, and tomato.
Nouveau Gefilte?
I love fish cakes as a modern alternative to traditional gefilte fish. The origins of gefilte fish as a Shabbos food come from obviating the need to separate bones when eating (thus avoiding the prohibition of separating on Shabbos) since it’s a ground-up mixture. Practically, gefilte also stretched expensive fresh fish with tasty fillers to feed more people. Fish cakes also accomplish this, but in a fraction of the time and with better texture and mouthfeel (in my opinion!). The best part is that you can easily make a large batch and freeze raw on a sheet pan. Thaw and fry fresh at your leisure!
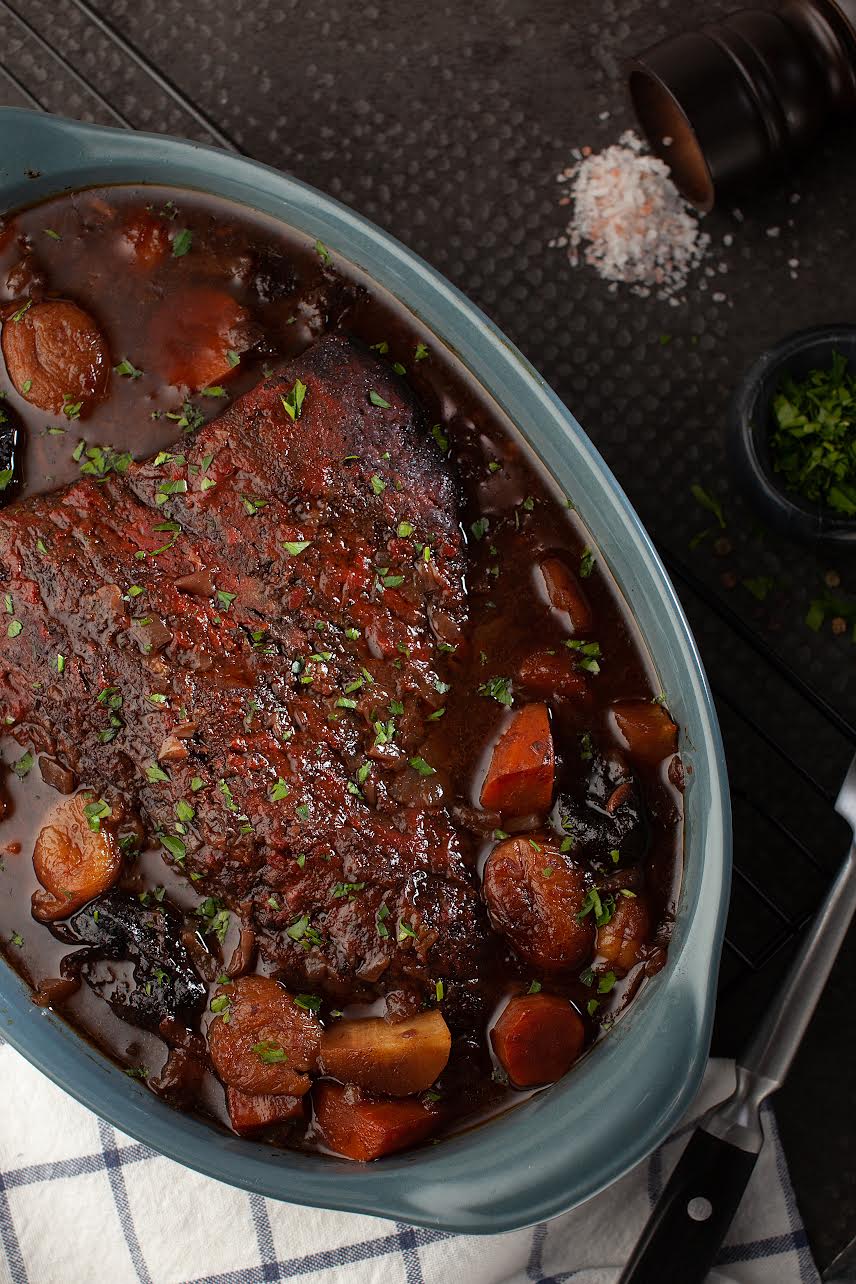
Spiced French Roast with Dried Fruits
This braised meat is perfect for Seder night or any special time of year. A super aromatic spice rub infuses the meat with flavor overnight, so plan to marinate a day ahead! This recipe can be used interchangeably with brisket or top-of-the-rib. Amounts double easily for a larger cut of meat.
Cook’s Note: For a thicker sauce, transfer cooking liquid into a small saucepan and bring to a simmer over medium heat for about 15–20 minutes, reducing until thickened to desired consistency.
Do Ahead: This can be made 2–3 days ahead. For best slicing success, slice when cold; re-warm covered in a 350°F oven for 20–30 minutes.
- 2 teaspoons kosher salt
- 1 teaspoon ground coriander
- ¾ teaspoon ground cumin
- ½ teaspoon freshly ground black pepper
- 1 teaspoon ground cinnamon
- ¼ teaspoon ground nutmeg
- ½ teaspoon ground allspice
- 1 (3-pound) French roast
- 2–3 Tablespoons canola or vegetable oil
- 2 medium onions, sliced (about 3 cups)
- 4 cloves garlic, chopped
- 1 cup dry red wine
- 2 small or 1 large parsnip, peeled and cut into 1-inch pieces
- 2 small or 1 large carrot, peeled and cut into 1-inch pieces
- ½ cup whole pitted prunes
- ½ cup dried apricots
- 2 Tablespoons water
- 1½ Tablespoons honey
- 1 Tablespoon tomato paste
- chopped parsley, for garnishing
Directions
- Rub: Combine salt, coriander, cumin, black pepper, cinnamon, nutmeg, and allspice together in small bowl. Arrange roast in large roasting pan; rub spice mixture evenly over both sides. Cover and refrigerate overnight.
- Brown: Preheat oven to 325°F. Heat 2 tablespoons of canola oil in a very large skillet over high heat. Carefully place roast in the skillet, and brown for 1–2 minutes per side, turning once. Remove roast from pan and transfer to a plate.
- Deglaze: Lower heat to medium and add another tablespoon of oil to the pan if it looks dry. Add onions and garlic and sauté, stirring often, about 5–6 minutes, or until translucent. Pour wine into the pan and deglaze, scraping up the browned bits at the bottom of the pan. Bring to a boil and simmer for 2–3 minutes. Transfer mixture to a roasting pan, arranging the roast on top, fat side up. Surround roast with parsnips, carrots, prunes, and apricots.
- Braise: In a separate small bowl, mix together water, honey, and tomato paste. Stir to blend and then pour over the top of the roast, spreading to cover. Cover pan tightly with foil and bake until tender, about 2½ hours (or longer for larger cuts). Meat is done when a fork pierces and releases easily. Allow meat to rest and cool, about 30 minutes.
- Serve: Transfer roast to a cutting board or work surface. Using a very sharp carving knife, thinly slice roast against the grain on a slight diagonal. Transfer slices to a serving platter, surround meat with the roasted vegetables and fruits, and garnish with chopped parsley. Serve with pan juices.
Serves 6–8
Prep time: 20–30 minutes plus marinating time
Cook time: 2½ hours
Difficulty: Worth the wait
GF/Freezer friendly/Pesach friendly
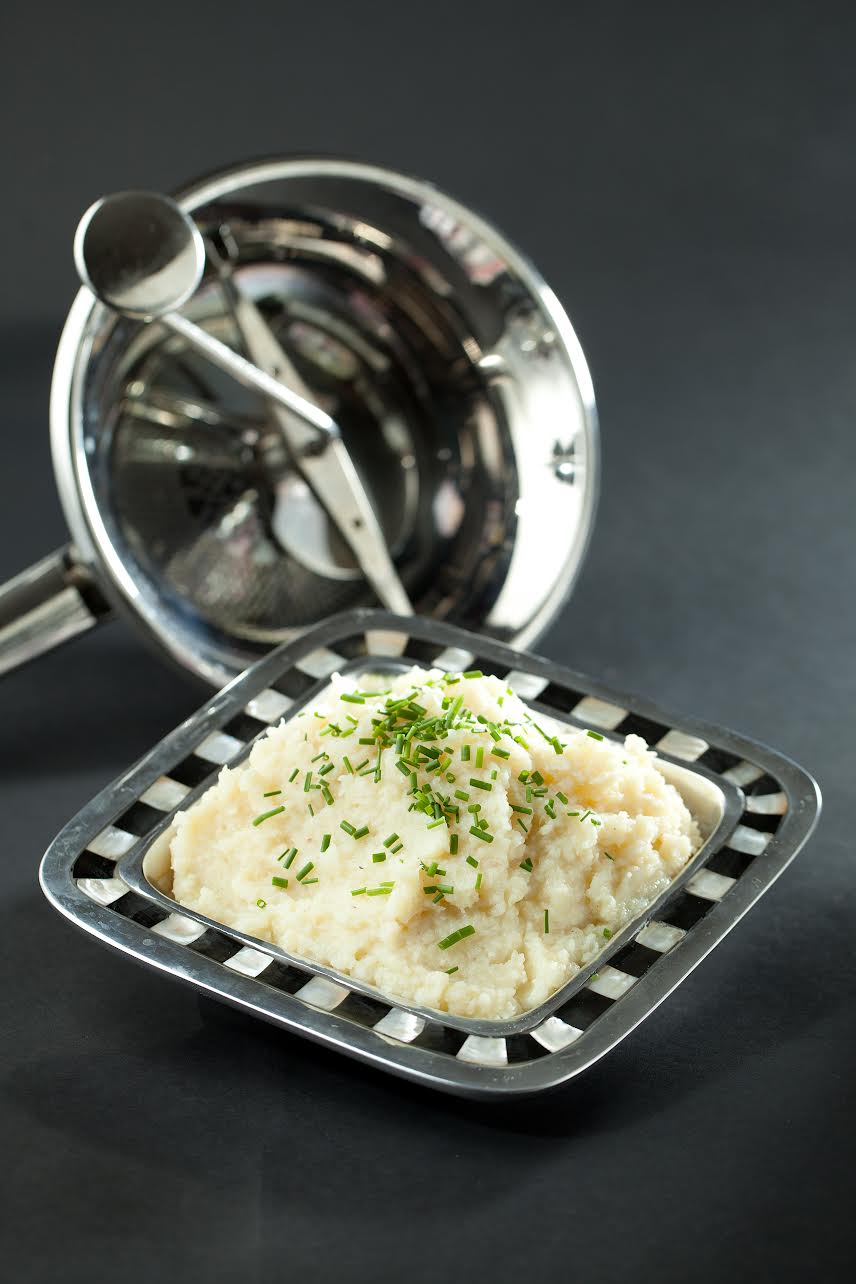
Celeriac and Potato Puree
Purees are wonderful as a side dish or background accompaniment; a blank canvas upon which you can showcase a short rib or chicken breast. Try this with kohlrabi instead of celeriac for a slightly sweeter variation (the combination actually tastes like cauliflower!).
Cook’s Note: I like using a food mill for the best texture and total control; if using a food processor, pulse just until you reach desired consistency.
- 1 large celeriac (a.k.a. celery root), peeled and chunked
- 4 large or 6 small potatoes, peeled and chunked
- kosher salt to taste, plus 1 teaspoon
- 1–2 Tablespoons butter or olive oil
- freshly ground black pepper, to taste
- fresh minced herbs such as dill, parsley, etc. (optional)
Directions
- Boil: Fill a large pot with salted water. Place over medium-high heat and bring to a rolling boil. Add celeriac and potatoes. Return to a boil and simmer for about 20–25 minutes, or until celeriac is tender and easily pierced with a fork.
- Puree: Remove from heat. Set a food mill fitted with a medium blade over a large bowl. Using a slotted spoon, remove celeriac and potatoes (reserve some of the cooking water), and transfer to the food mill. Rotate food mill until all of the celeriac and potatoes are pureed; you may need to do this in batches. Add butter or olive oil to the hot milled mixture; stir to dissolve and blend. (Alternatively, you can use a food processor fitted with an “S” blade. Process celeriac and potatoes with butter or oil by pulsing until pureed.)
- Adjust and season: Add a little of the reserved cooking water to mixture only as needed to thin consistency if too thick. Season to taste with plenty of salt and pepper and herbs if desired.
Roasted Garlic Variation:
For a stronger flavor, add 2 roasted garlic cloves (peels removed) to the food mill prior to pureeing.
Celeriac and Potato Puree
What did people use before food processors? The food mill! It’s a great tool for blending foods to specific textures with precision and total control. The fine disc is perfect for completely smooth purees like baby food, and the medium disc makes perfectly textured applesauce while holding back unwanted skins.
Serves 6–8
Prep Time: 10–15 minutes
Cook Time: 25 minutes
Difficulty: Easy-peasy
GF/Vegan/Pesach friendly
SHARE


